Follow the progress of construction (and sometimes destruction) of my N-scale model train layout.

April 27, 2011

Golden Spike


I put down the last piece of track on the two main loops last night. Now I can run two trains continuously. I still have to finish off a few sidings but those are easy to do.

In the photo to the left you can see the back side of the layout. The track and passing siding on the right will be hidden behind a hill. The middle portion of the track on the right will visible from the front of the layout. It will enter a tunnel in the hill where it gets close to the track on the left at the top and bottom of the photo.

April 24, 2011

Finished Control Panel


I finished the control panel yesterday and am pretty pleased with the way it came out. I made the frame out of 1x3. The top is a 8.5 x 5.5 inch sandwich of of plexiglass, the printed track plan, and a sheet of styrene. I even counter sunk the screws on top so that they are flush with the top of the glass

April 22, 2011

Avoiding Sub-layout Hazards


I was working on the layout this morning and ran into a problem. I had planned to place a wire drop at the end of a long curve of flex track; however the flex track ended right above a cross beam in my layout. This meant I could not make a wire drop from that location that went straight down; it would hit the beam. For various reason I wanted to avoid altering the track setup or moving the location of the drop on the surface of the layout.

I realized that my wire drop didn't have to go straight down. If I went at a 45 degree angle I would be able to have the drop at the location I wanted on the surface of the layout and still have the wires miss the beam underneath.

I think this solution could also be applied for mounting Tortoise switch machines as well. A 45 degree wedge mounted on the bottom of the layout would be required to angle the machine. Adding a 45 degree bend to the music wire right before it enters the throwbar would probably be easier than trying to drill a 45 degree hole through the throwbar.

April 17, 2011

Control Panel


I have been working on laying more track. Today I have installed 4 of the 6 switch machines; the two pairs for the front crossovers. I wanted to try them out but have not gotten around to wiring up the switches for them This afternoon I drew up a design for the switch control panel. This will managed the two crossovers in front as well as the two hidden switches for staging in the back.

April 6, 2011

Layout Update

So it has been a month since my last post, but that doesn't mean I have been idle on the train layout.

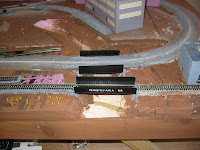
A big area of work was the two bridges that span the river. In my previous post I talked about scratch building one. Since then I constructed abutments, painted the bridge, and installed it. For my scratch build bridge I installed it so that the deck was level with the ground and secured the cork road bed to it using caulk. I am planning ballasting this bridge.
I had to raise the abutments for the Atlas prefab bridge, the one in the front of the picture, to the level of the cork roadbed since it had the track pre-installed. It also has more detail for the bridge ties so I will not try to ballast this one.

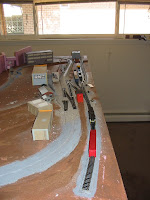
Track laying has also begun. I started by painting the cork road bed with grey acrylic paint. I thinned the paint with water to make it spread a little easier; it doesn't have to be opaque, just enough to give the cork a grey tint. The idea is that I can just apply a light coat of ballast and any cork that happens to show through will not be as noticeable against the grey ballast. Since the roadbed for the main line was still incomplete due to the missing bridges, I started with the yard at the front of the layout. The yard turnouts are controlled manually by ground throws placed next to the turnouts. They are much easier to install than hooking wiring up a switch machine.

The next step is to install the crossovers and the Tortoise switch machines that will control them. I am taking the trouble to install switch machines here because the two turnouts are connected by legs so it doesn't do any good to switch one without switching the other. Using the machines lets me insure that they are always consistently aligned.