Track Cleaning Car

Fed up with my engines stalling out I deciced to look at a track cleaning solution. I found one I liked. The Eliminator by Aztec, but at $60 it was a bit pricey. I decieded to build my own.
The first thing I did was hot glue togethor 6 nickles into 2 stacks of 3 each. I then drilled a hole in the center of both stacks that was large enough to fit a tooth pick into. I then put them both on a tooth pick seperated by a plastic washer. The washer gave me the spacing I needed as well as served as an insulator in case the roller ever came in contact with both rails. I topped this all off by cutting a strip of paper towel the same width as my roller and securing it with a drop of white glue.
To house the roller I took a old Bachmann 50 ft. box and removed the thin steel weight on the bottom. I cut out an hole in the bottom of the plastic frame big enough to fit the roller into. I left a little bit of the bottom frame on either side to connect the two trucks.
I drilled two holes in the sides of the box car body to serve as supports for my toothpick axel. They were offset slightly so that the roller was at an angle. This was done to provide the scrubbing action so that the roller does not simply roll along the tracks as another set of wheels. I found this bit of information on the track cleaning car page of Aztec's website. They were centered at a height that allowed the roller to just touch the top of the rail. I then elongated them vertically to give the roller a bit of play. This would allow it to stay in contact with the top of the rail even if the track moved up and down slightly.
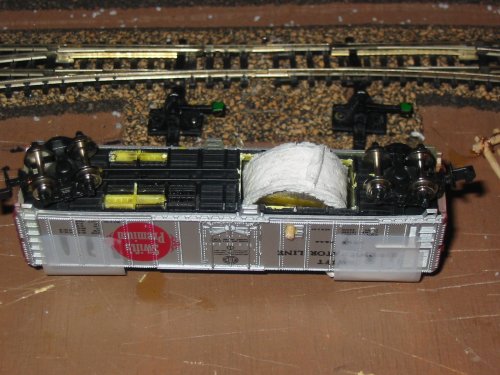
I assembled the bottom frame and the box car body. I placed the roller inside the body and aligned the axel holes before inserting the toothpick axel. I also placed a half ounce weight over each of the trucks. Otherwise the car was so light that it would derail if the roller encountered any resistance.
It definitely could use some improvement, however there was dirt on the roller after my trial run so is not totally ineffectual. The biggest problem was that the roller was too narrow. It worked ok on the straight sections but on the curved sections one slide would slip off the railhead and fall down onto the ties. Widening the roller requires removing the small sections of the frame body that connect the two trucks. To fix this a support structure the goes over the top of the roller is required to keep the trucks spaced correctly.
Also on my to do list is to add a magnet and a pipe cleaner brush to the other side of the car. But these modifications are easier to do and I will leave them until I have the roller problem fixed.
posted by Mark at
5:04 PM
![]()

0 Comments:
Post a Comment
Subscribe to Post Comments [Atom]
<< Home